Pixel device preparation
This section details the preparation steps required for Google Pixel Android devices before automated testing.
Pixel phones have no accidental touch protection setting, and the Samsung-only steps (software update service, SMS input mode) do not apply. Automatic system updates are turned off by hand in step 13.
Checklist
Before Prepare, by hand:
- Enable Developer Options and turn on USB debugging.
- Turn on Stay awake and Disable adb authorization timeout.
- Turn off Automatic system updates.
- Set the screen lock to None: Prepare does not change it.
Connect the phone to the Test Node, accept Allow USB debugging, and complete its Mobile ID on the Mobile ID's page: a descriptive name and the real MSISDN, National Format, IMSI and IMEI (Phone Preparation).
Run Prepare from the Mobile ID's page (Phone Preparation). It applies the steps marked Done by Prepare below and emails you the result of each step.
After Prepare, by hand:
- Erase the remaining call forwarding with
##002#(Disable Call Forwarding Settings). - Do any step that the Prepare email lists as failed: each step marked Done by Prepare has a Set it by hand section for this.
Printable checklists for all brands (PDF)
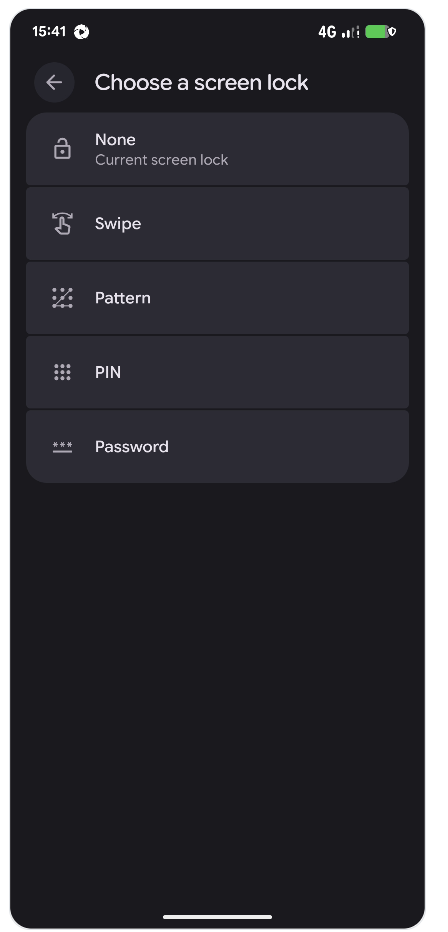
1. Unlock Screen
Manual step
Prepare does not change this setting. Set it by hand.
- Open Settings.
- Tap Security & privacy.
- Tap Device unlock (Android 13: Device lock).
- Tap Screen lock and choose None.
2. Enable Developer Options
Manual step
Prepare does not change this setting. Set it by hand before you run Prepare.
- Open Settings.
- Go to About phone.
- Tap Build number 7 times.
- Enter the device PIN, pattern, or password if prompted.
- Return to Settings.
- Go to System.
- Confirm that Developer options is now visible.
After Developer Options is visible, continue with Check if Developer Options is Enabled to enable USB debugging and the required automation settings.
3. Check if Developer Options is Enabled
Manual step
Prepare does not change this setting. Set it by hand before you run Prepare.
Enabling USB Debugging in Pixel Devices
If Developer options is not visible yet, complete Enable Developer Options first.
- Open Settings.
- Go to System → Developer options.
- Ensure Developer options is enabled.
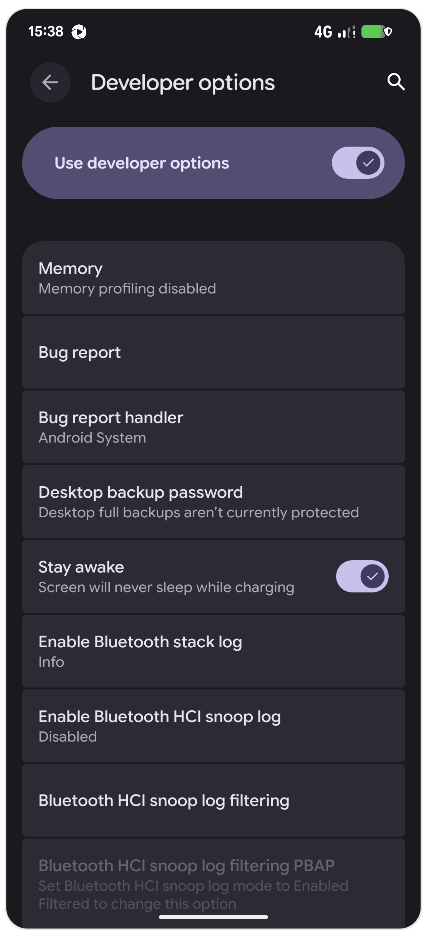
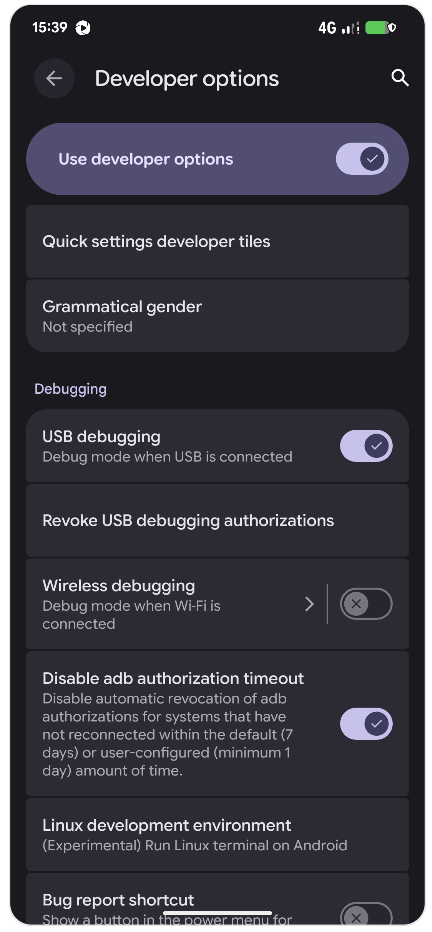
- In Developer options, make sure the following are enabled:
- Use developer options – ON (the switch at the top)
- USB debugging – ON
- Stay awake – ON
- Disable ADB authorization timeout – ON
On Android 11+, this prevents ADB access from expiring after 7 days of inactivity.
4. Enable Stay Awake
Manual step
Prepare does not change this setting. Set it by hand before you run Prepare.
The Stay Awake feature keeps the screen on while the device is charging, which is essential for automated testing to prevent the screen from locking during test execution.
Steps
- Open Settings.
- Go to System.
- Tap on Developer options.
- Find the Stay awake option.
- Toggle it to the ON position.
When enabled, this setting prevents the device screen from turning off while connected to a charger. This is particularly important during automated testing as it ensures continuous interaction with the device without interruptions from screen timeouts.
5. Disable Adb Authorization Timeout
Manual step
Prepare does not change this setting. Set it by hand before you run Prepare.
Disabling the ADB authorization timeout prevents the device from automatically revoking ADB authorization, which is essential for maintaining a continuous debugging or automation session.
Steps
- Open Settings.
- Go to System.
- Tap on Developer options.
- Find Disable adb authorization timeout.
- Turn it on.
With this option on, the phone keeps the USB debugging authorization of the Test Node even when it has not been connected for 7 days, so the Test Node does not need to be authorized again.
6. Turn Off Connections
Done by Prepare
Prepare applies this setting automatically.
Set it by hand (only if Prepare reports this step as failed)
- Open Settings.
- Tap on Network & internet.
- Tap Internet.
- Turn Wi-Fi off.
Prepare turns Wi-Fi off and airplane mode off on every Android phone. Test steps that need Wi-Fi switch it on themselves.
7. Airplane Mode
Done by Prepare
Prepare applies this setting automatically.
Set it by hand (only if Prepare reports this step as failed)
Airplane mode must be off.
- Swipe down to open Quick Settings.
- Make sure Airplane mode is off.
8. Disable Screen Rotation
Done by Prepare
Prepare applies this setting automatically.
Set it by hand (only if Prepare reports this step as failed)
- Swipe down to open Quick Settings.
- Tap Auto-rotate to turn it off.
You can also turn off Settings > Display (Android 16: Display & touch) > Auto-rotate screen.
9. Disable Accidental Touch Protection
Google Pixel phones have no accidental touch protection setting, so there is nothing to do in this step.
10. Mute Device
Done by Prepare
Prepare applies this setting automatically.
Set it by hand (only if Prepare reports this step as failed)
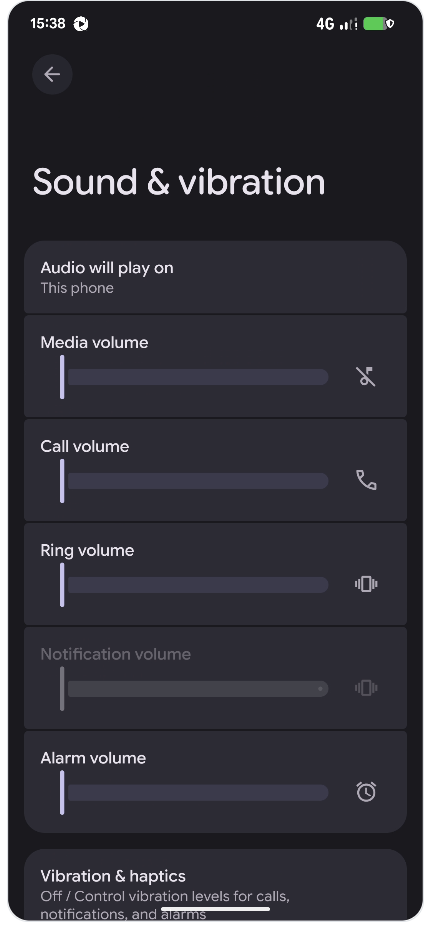
Set the ringer to Mute.
Steps
- Press a volume button on the side of the phone.
- In the volume panel, tap the ringer icon until it shows Mute (the choices are Ring, Vibrate and Mute).
You can also open Settings > Sound & vibration and drag the volume sliders (media, call, ring, alarm) to 0.
11. Set Time Format to 24 Hours
Done by Prepare
Prepare applies this setting automatically.
Set it by hand (only if Prepare reports this step as failed)
- Open Settings.
- Tap on System.
- Tap Date & time.
- Turn off Use locale default.
- Turn on Use 24-hour format.
12. Set Timezone
Done by Prepare
Prepare applies this setting automatically.
Set it by hand (only if Prepare reports this step as failed)
To ensure consistent time representation across different test runs, it's important to set the device to use automatic date & time and timezone settings.
Steps
- Open Settings.
- Go to System.
- Tap on Date & time.
- Turn on automatic date and time and automatic time zone.
This ensures that the device's time settings are synchronized with network time, providing consistent timestamps for testing and logs.
13. Disable System Auto Update
Manual step
Prepare does not change this setting. Set it by hand before you run Prepare.
Disabling system auto-update prevents the device from automatically updating system components during testing, which could interrupt test execution or change device behavior.
Steps
- Open Settings.
- Go to System.
- Tap on Developer options.
- Find Automatic system updates ("Apply updates when device restarts").
- Turn it off.
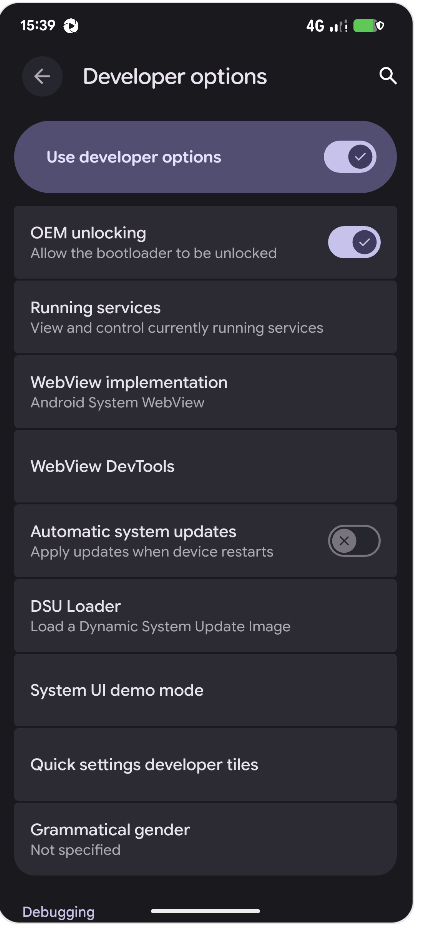
Disabling this feature ensures that the device's system components remain consistent throughout the testing process, preventing unexpected changes in behavior that could affect test results.
14. Set SMS App
Done by Prepare
Prepare applies this setting automatically.
Set it by hand (only if Prepare reports this step as failed)
Google Messages – Required Settings for SMS/MMS Test Compatibility (Pixel Devices)
To ensure stable SMS and MMS behavior during testing on Pixel devices, configure the following settings in the Google Messages app:
📩 Enable MMS Auto Download (Normal + Roaming)
- Open the Google Messages app.
- Tap the profile icon ➔ Messages settings ➔ Advanced.
- Enable both options:
- Auto-download MMS – ON
- Auto-download MMS when roaming – ON
💬 Turn Off RCS Chats (If Available)
Pixel phones often have RCS chats turned on by default in Google Messages. For testing purposes, RCS must be turned off.
- Open the Google Messages app.
- Tap the profile icon ➔ Messages settings ➔ RCS chats (called Chat features in older app versions).
- Turn off Turn on RCS chats and confirm with Turn off.
🔍 If RCS chats is not shown, RCS is not available on the phone—no further action needed.
15. Prepare Chrome for Development
Done by Prepare
Prepare applies this setting automatically.
Set it by hand (only if Prepare reports this step as failed)
Before running the first automated test, Chrome must be manually opened and prepared on the device to avoid pop-up interruptions and permission blocks.
Manual Preparation Steps
- Open the Chrome browser on the target device.
-
If prompted, accept or decline the following:
- Welcome screen or initial setup wizard
- “Set as default browser” prompt
- Sync with Google Account prompt (select "No Thanks")
- Terms and conditions (accept if shown)
- Location, notifications, or other permissions (select "Deny" or "Allow" as needed)
-
Close any tutorials, tips, or popup cards that may appear.
-
Once the browser is fully ready and no prompts remain, exit Chrome.
✅ This ensures that the first automated test will execute smoothly without interruptions from UI dialogs or system pop-ups.
16. Disable Call Forwarding Settings
Partly done by Prepare
Prepare erases unconditional call forwarding. Forwarding when busy, unanswered or unreachable is not changed: erase it with Option 1 below.
To reset all Call Forwarding (CF) settings on a device:
Option 1: Using USSD Code
Run the following code in the Phone app dialer:
This code erases all types of call forwarding. It depends on the network and also removes forwarding to voicemail: - Always forward - Forward when busy - Forward when unanswered - Forward when unreachable
Option 2: Manual Reset on Pixel Devices
If the USSD code does not work on Google Pixel devices, follow these steps to manually disable call forwarding:
Steps:
- Open the Phone app.
- Open the menu (☰ at the top left; ⋮ at the top right in older versions of the app).
- Select Settings.
- Tap Calling accounts.
- Choose your active SIM.
- Tap Call forwarding.
- You will see the following options:
- Always forward
- When busy
- When unanswered
- When unreachable
- Tap each one and select Turn off.
⚠️ Ensure that all four call forwarding types are disabled for complete CF removal.
Note
If you are manually controlling the phone for testing purposes, please ensure that all CF settings are returned to default once testing is complete.