Test case actions
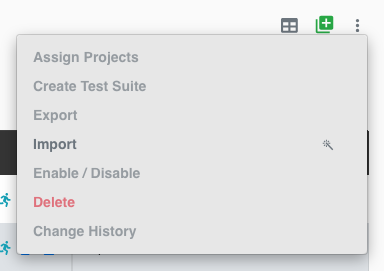
Select one or more test cases, then open the ⋮ menu at the top right of the Test Cases list. It offers Assign Projects, Create Test Suite, Export, Import, Enable / Disable, Delete and Change History. A single test case is run with the Run Now icon on its row, not from this menu.
Run (Direct Run)
You can now run a single test case directly from the Test Cases page, without first adding it to a test suite. This makes it much faster to validate or re-run an individual test case.
How to use it
- Go to the Test Cases page.
- Click the runner icon (Run Now) on the row of the test case you want to run.
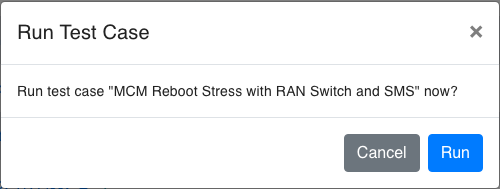
- The Run Test Case dialog appears. Click Run to start the test case immediately (or Cancel).
- Once started, the message "Run started for "
". View execution #N" appears, with a direct link to the execution. - While it runs, the runner icon turns into a spinner (Running); click it to open the execution.
If the test case is already running, the message reads "A run for "
Viewing a Direct Run
Test cases started this way appear on the Executions page tagged as Direct run, so you can easily tell them apart from suite-based runs and follow their progress.

Note
See also Run a Test Case via API and Run History.
Run History
You can quickly review the run history of an individual test case or test suite directly from its row in the list — without leaving the page.
For a Test Case
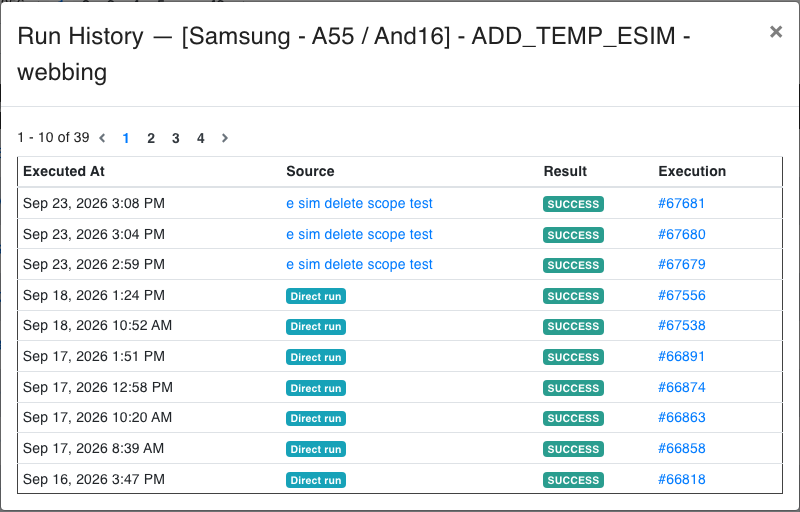
Find the test case you're interested in and click the Run History icon on its row.

The Run History —
- Direct run — a badge: it was run directly (suite-less).
- Otherwise, a link to the test suite it was run as part of.
When the test case has never run, the window reads "No runs yet".
For a Test Suite
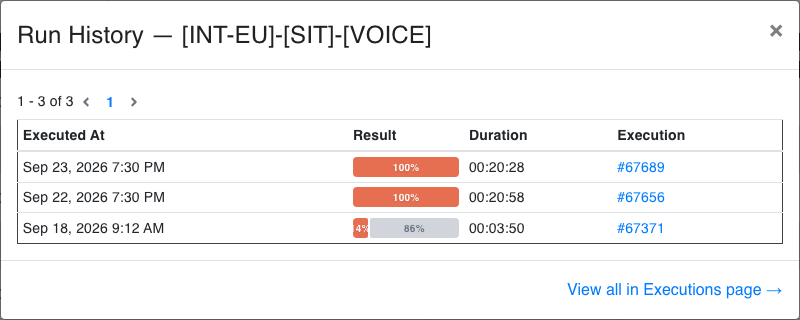
The same feature is available for test suites. Open the Run History window from the suite's row to see when it was executed, along with a Result bar, the Duration ("Still running" for a run in progress), a Re-run badge for re-runs, and a link to each Execution. The link View all in Executions page → at the bottom opens the Executions page filtered to the suite.
Change History 
The Change History feature allows you to view the modifications made to a test case. This feature is accessible via the ⋮ menu by selecting Change History, which is enabled when exactly one test case is selected. The change history provides details on what changes were made, who made them, and when they were made. If there are no changes, a message indicating this will be displayed.
Viewing Change History
To view the change history of a test case, follow these steps:
- Select a Test Case: Choose the test case for which you want to view the change history.
- Open the Action Dropdown: Click on the ⋮ menu.
- Select "Change History": The
change history window opens.
Change History Details
When there are changes recorded for the selected test case, the change history dialog will display the following information:
- What was Changed: The specific details of the changes, such as the name, device ID, notes, etc.
- Who Made the Changes: The email address of the person who made the changes.
- When the Changes Were Made: The date and time when the changes were made.
Example
In the example below, you can see the changes made to the test case Quadified_eSIM_test_iPhone_XR_QR:
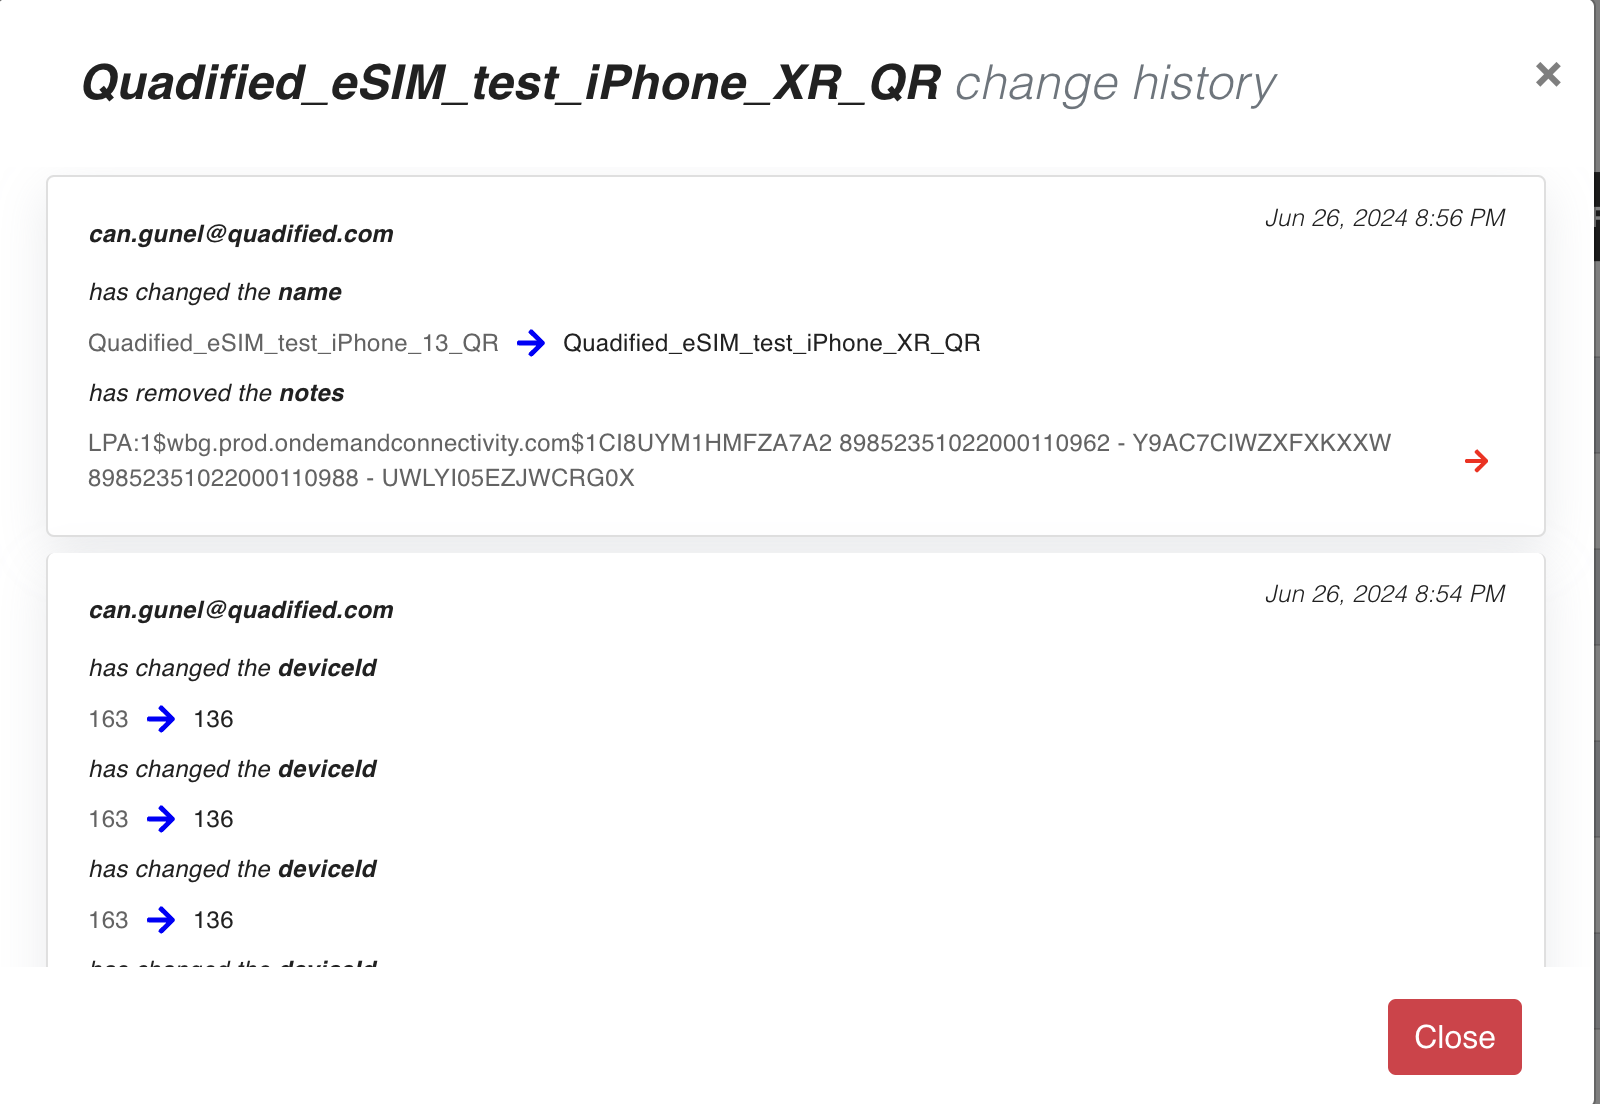
- The name was changed from
Quadified_eSIM_test_iPhone_13_QRtoQuadified_eSIM_test_iPhone_XR_QR. - The notes were removed.
- The device ID was changed from
163to136.
Each change is timestamped and attributed to the user who made the modification.
No Changes Found
If there are no changes recorded for the selected test case, the dialog reads "There are no changes on this entity":
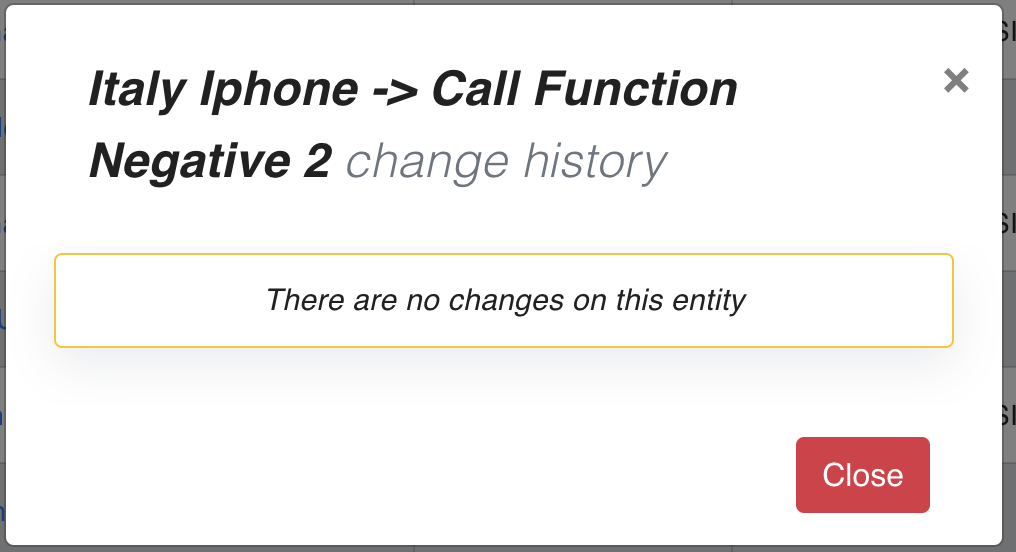
This ensures that you are aware that no modifications have been made to the test case since its creation or last recorded change.
Assign Projects
The purpose of "Assign Projects" is to include the selected test cases in projects.
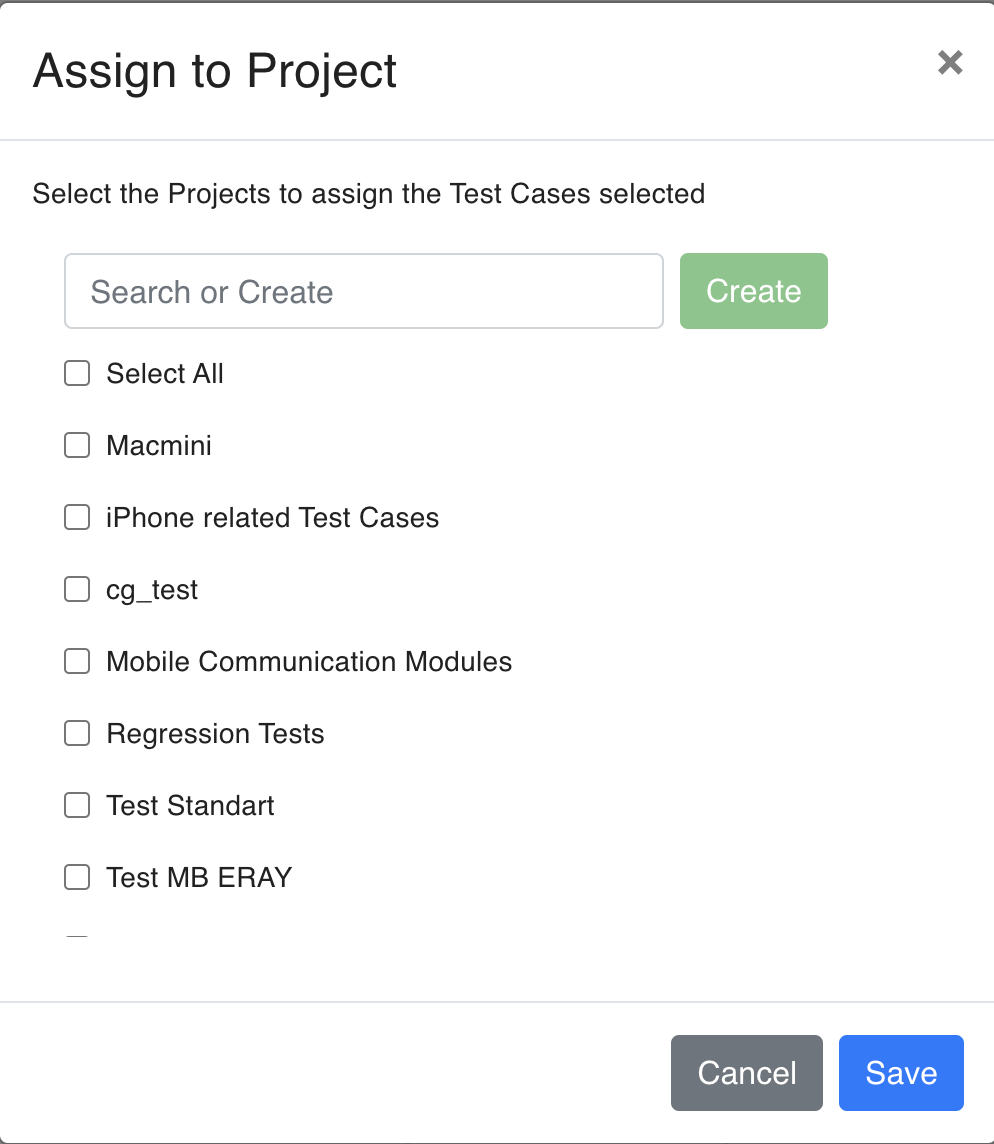
The Assign to Project window lists every project with a checkbox:
- To assign the selected item to a project, tick the project and click the blue button.
- To remove it from a project, untick the project and click Save.
- To create a new project, type its name in Search or Create and click the green button.
- Select All ticks every project in the list.
You can assign several selected items at once, but only when they are currently in the same projects; otherwise the action is disabled. Projects are renamed and deleted from the Projects filter in the top bar.
Create Test Suite
Create Test Suite ("Create Test Suites with selected Test Cases") makes a new test suite from the selected test cases.
- Select the test cases and choose Create Test Suite in the ⋮ menu.
- Enter a Name (at least 5 characters) and confirm.
- The suite's page opens.
Note
The new suite starts Deactivated, with a Failure Threshold of 99. Set a schedule and untick Deactivated on the suite's page when it should run on schedule; see Schedule a Test Suite.
Enable / Disable
Enable / Disable changes the state of the selected test cases in one step. Choose Enable or Disable; for Disable, the Disable Reason is required (up to 200 characters). A message such as "3 test cases disabled successfully!" confirms the change. Disabled test cases are skipped when their suite runs.
Export
The Export Test Case feature allows you to export the details of one or more test cases in JSON format. This is useful for backing up test cases, sharing them with others, or importing them into another system.
Exporting a Test Case
To export a test case, follow these steps:
- Select Test Cases: Choose the test cases that you want to export.
- Open the Action Dropdown: Click on the ⋮ menu.
- Select "Export": Choose the "Export" option from the dropdown.
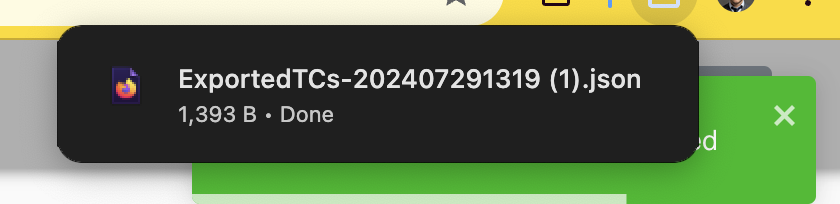
Once you select "Export", a JSON file containing the details of the test cases will be downloaded to your computer. Several test cases are exported into one file named ExportedTCs-YYYYMMDDHHmm.json. This JSON file includes all the information about the test case, such as its steps, parameters, and configurations.
JSON Format Details
The exported JSON file contains the following details of the test case:
- id: The unique identifier of the test case.
- name: The name of the test case.
- description: A description of the test case.
- testStepList: A list of steps in the test case, including the function, parameters, and expected outcomes.
- tags: Tags associated with the test case.
- disableReason: The reason for disabling the test case, if applicable.
- notes: Additional notes about the test case.
- disabled: A flag indicating whether the test case is disabled.
- traceFilters: Filters applied to trace the test case.
- sipTraceFilters: SIP trace filters applied to the test case.
- projects: Projects associated with the test case.
- devices: Devices associated with the test case.
Example JSON
Below is an example of the JSON format for an exported test case:
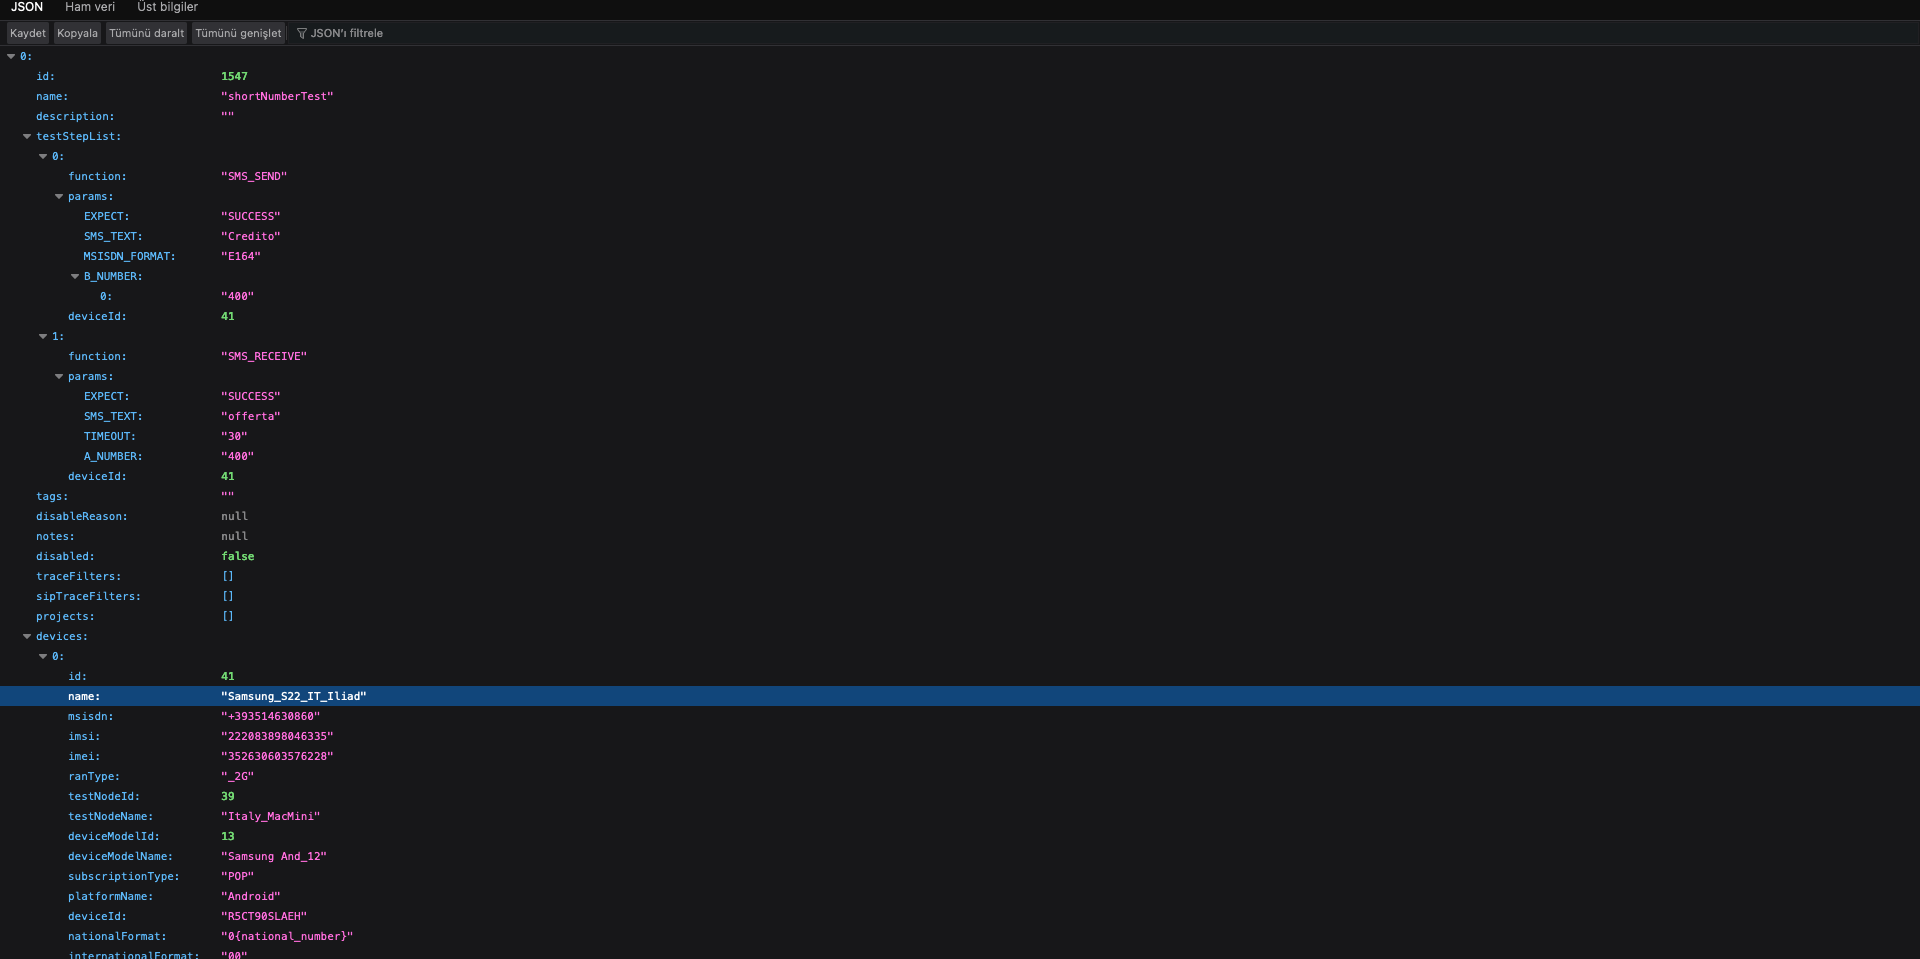
As seen in the example, the JSON file contains detailed information about the test case, including the functions used (SMS_SEND and SMS_RECEIVE), the parameters for each function, and the associated device details.
By exporting test cases in JSON format, you can easily manage and share your test scenario
Import Test Case from JSON file (duplicate Test Case)
The Import Test Case feature allows you to import test cases from a JSON file. This is useful for restoring test cases from a backup, sharing them with others, or transferring them from one system to another.
How to Use the Import Feature
To import a test case, follow these steps:
- Clear the selection: Import is disabled while any test case is selected.
- Choose the JSON File: Click on the "Import" option in the ⋮ menu and select the JSON file containing the test case details. One file can hold several test cases.
Import Wizard Steps
After selecting the JSON file, the Test Case Import Wizard will guide you through several steps to map and assign the imported test cases correctly. Imported test cases get the prefix "Imported " unless you change the name mapping. The wizard buttons are Cancel, Reset and Import TC.
1. Test Cases
This initial screen shows the selected JSON file and the imported test case name. You can modify the test case name if needed.
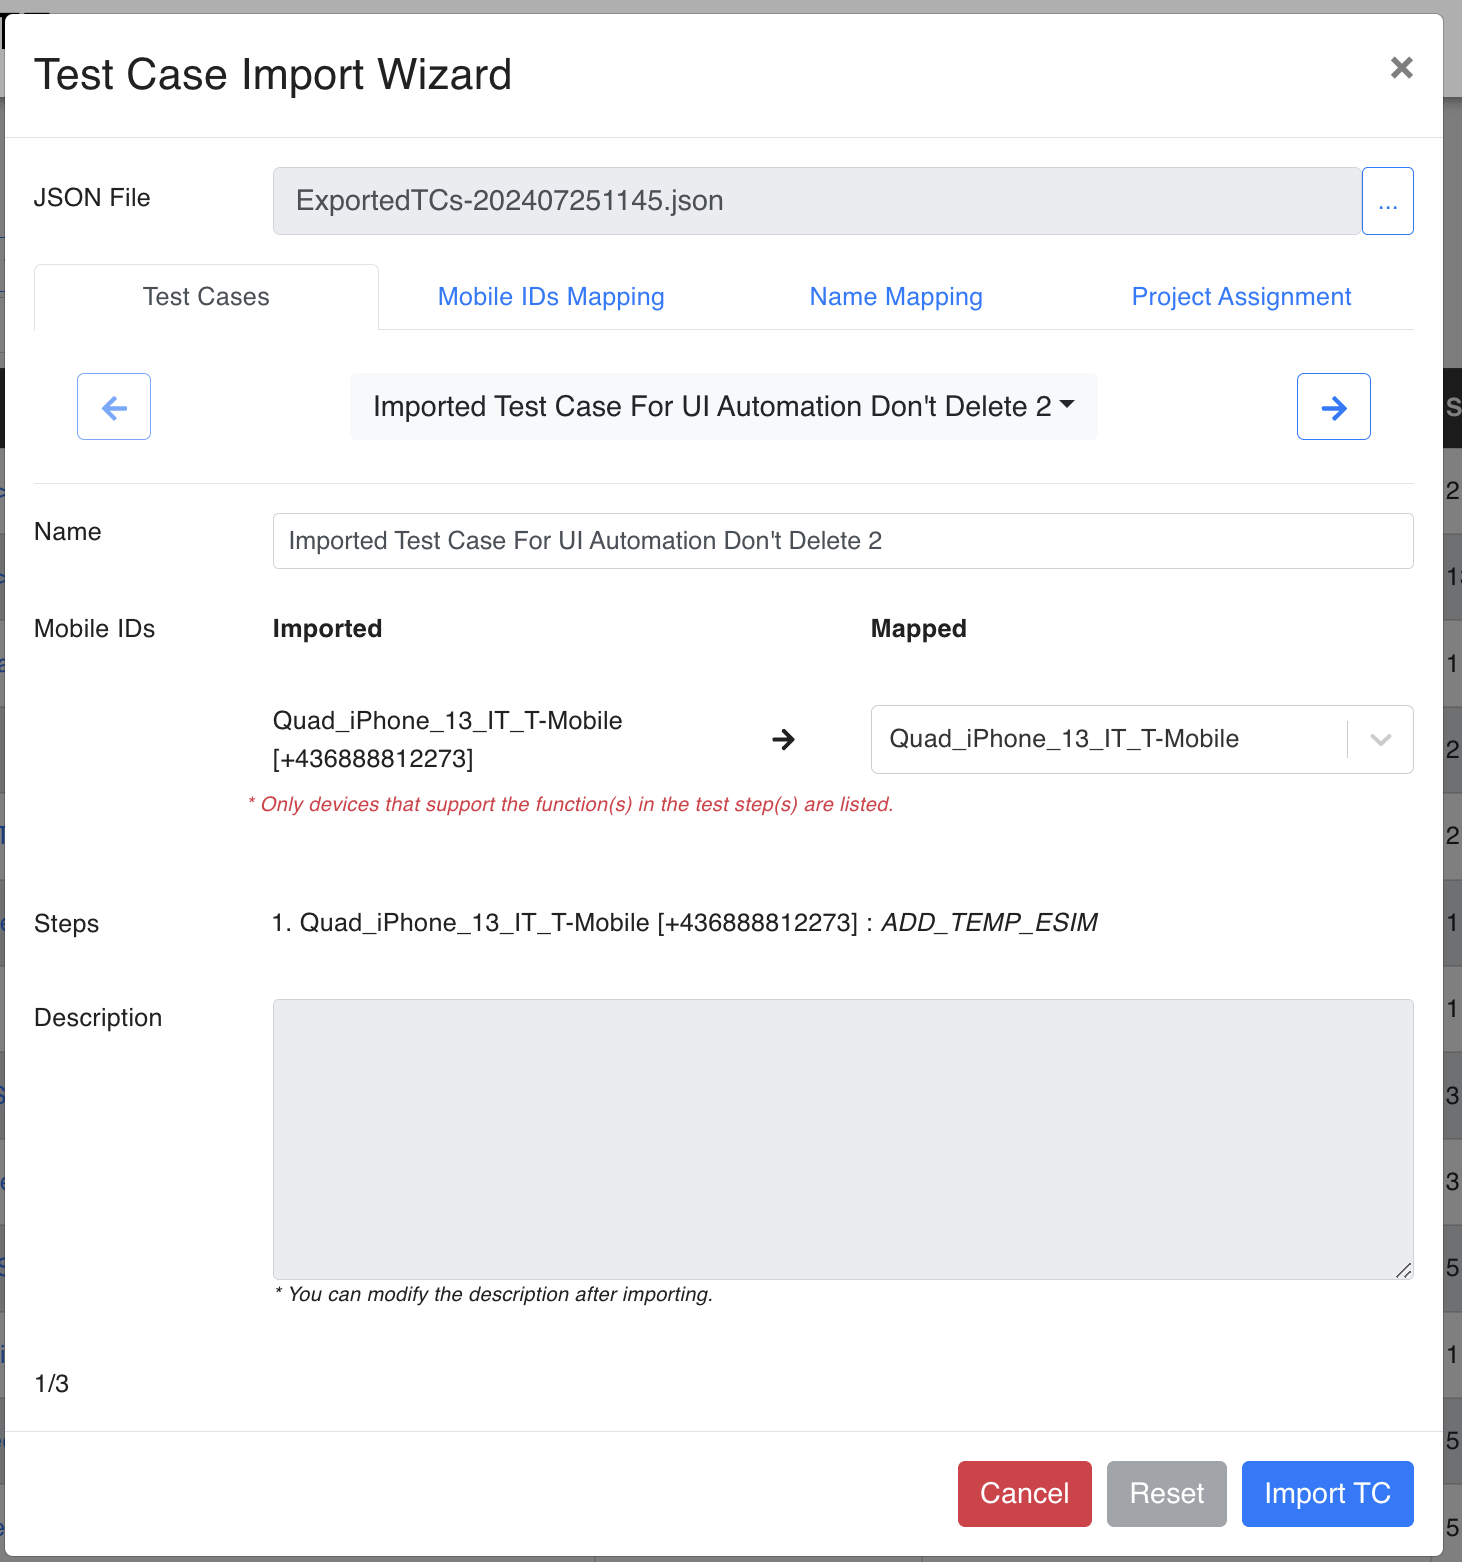
2. Mobile IDs Mapping
Map the imported mobile IDs to the corresponding mobile IDs in your system. Only devices that support the functions in the test steps will be listed.

- Imported: The mobile IDs from the JSON file.
- Mapped: The corresponding mobile IDs in your system.
3. Name Mapping
Configure the name mapping for the imported test case. You can add a prefix, suffix, or replace the existing name.
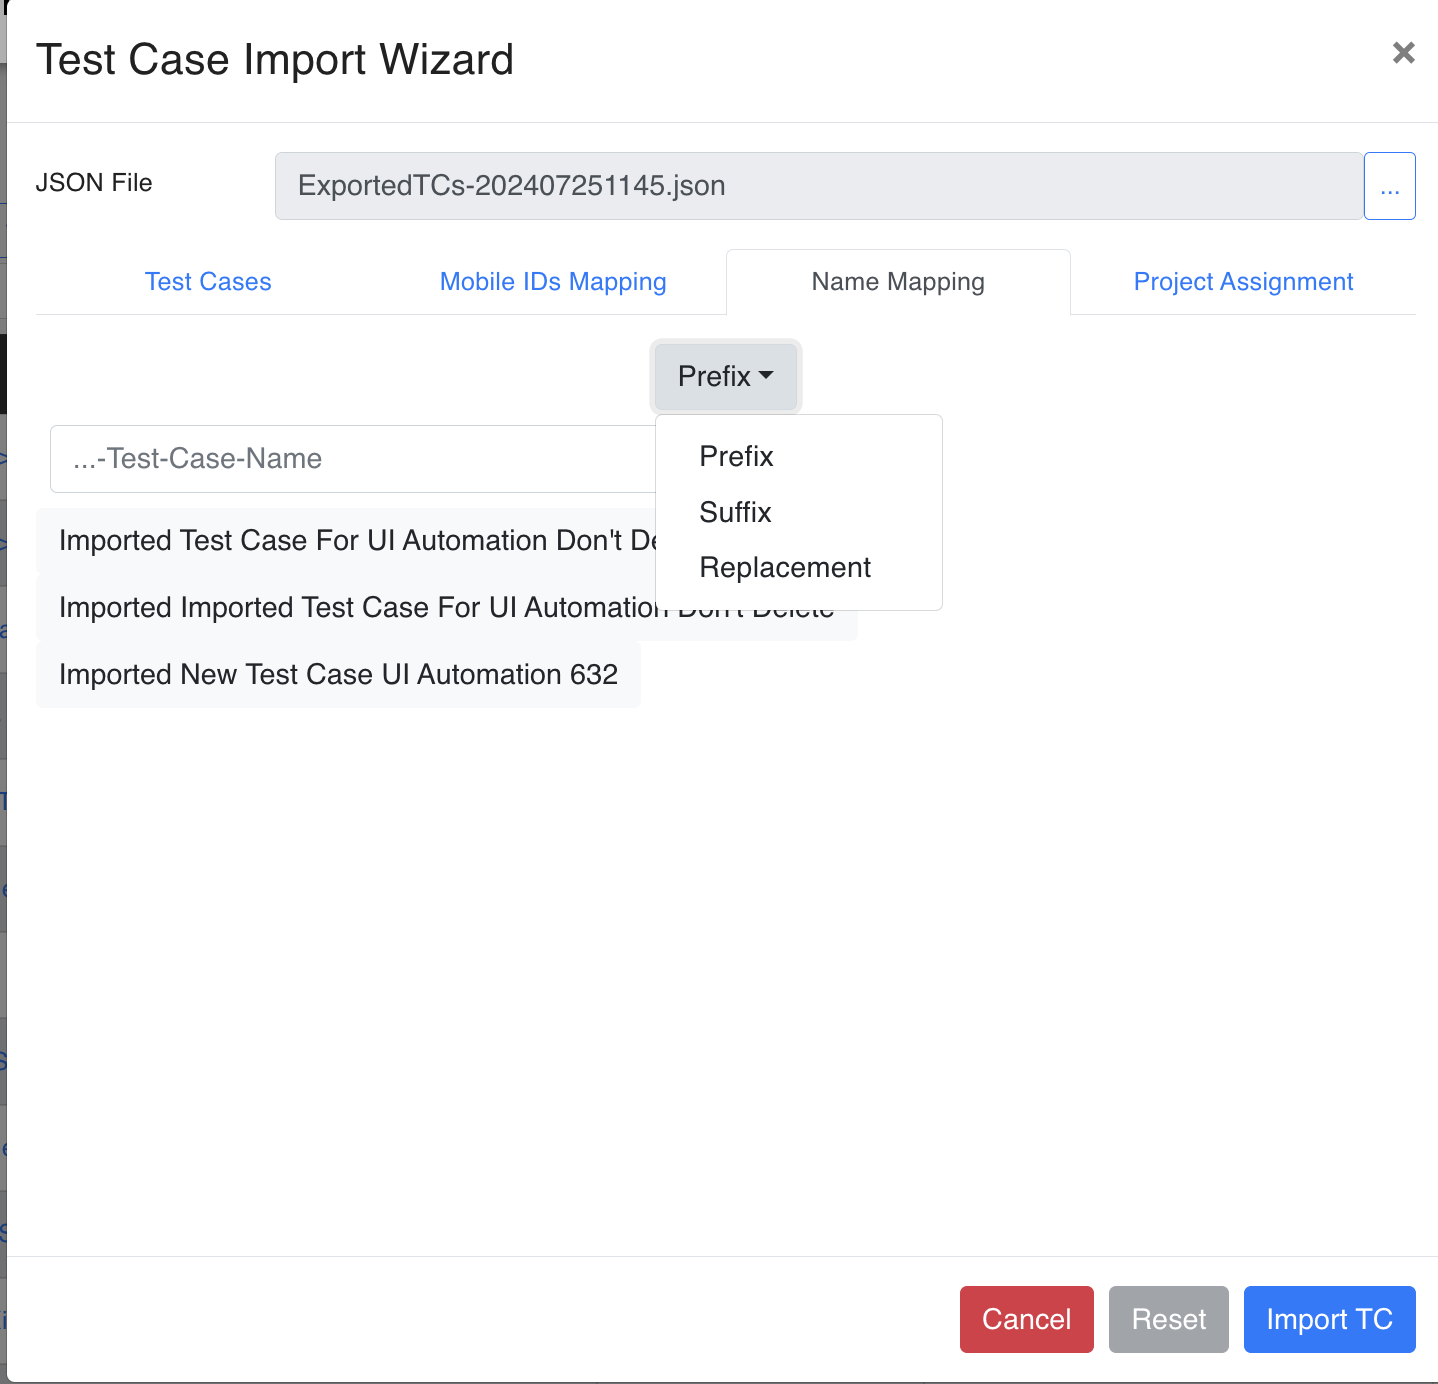
- Prefix: Add a prefix to the test case name.
- Suffix: Add a suffix to the test case name.
- Replacement: Replace the test case name entirely.
4. Project Assignment
Assign the imported test case to the relevant projects. You can select multiple projects to ensure the test case is correctly categorized.
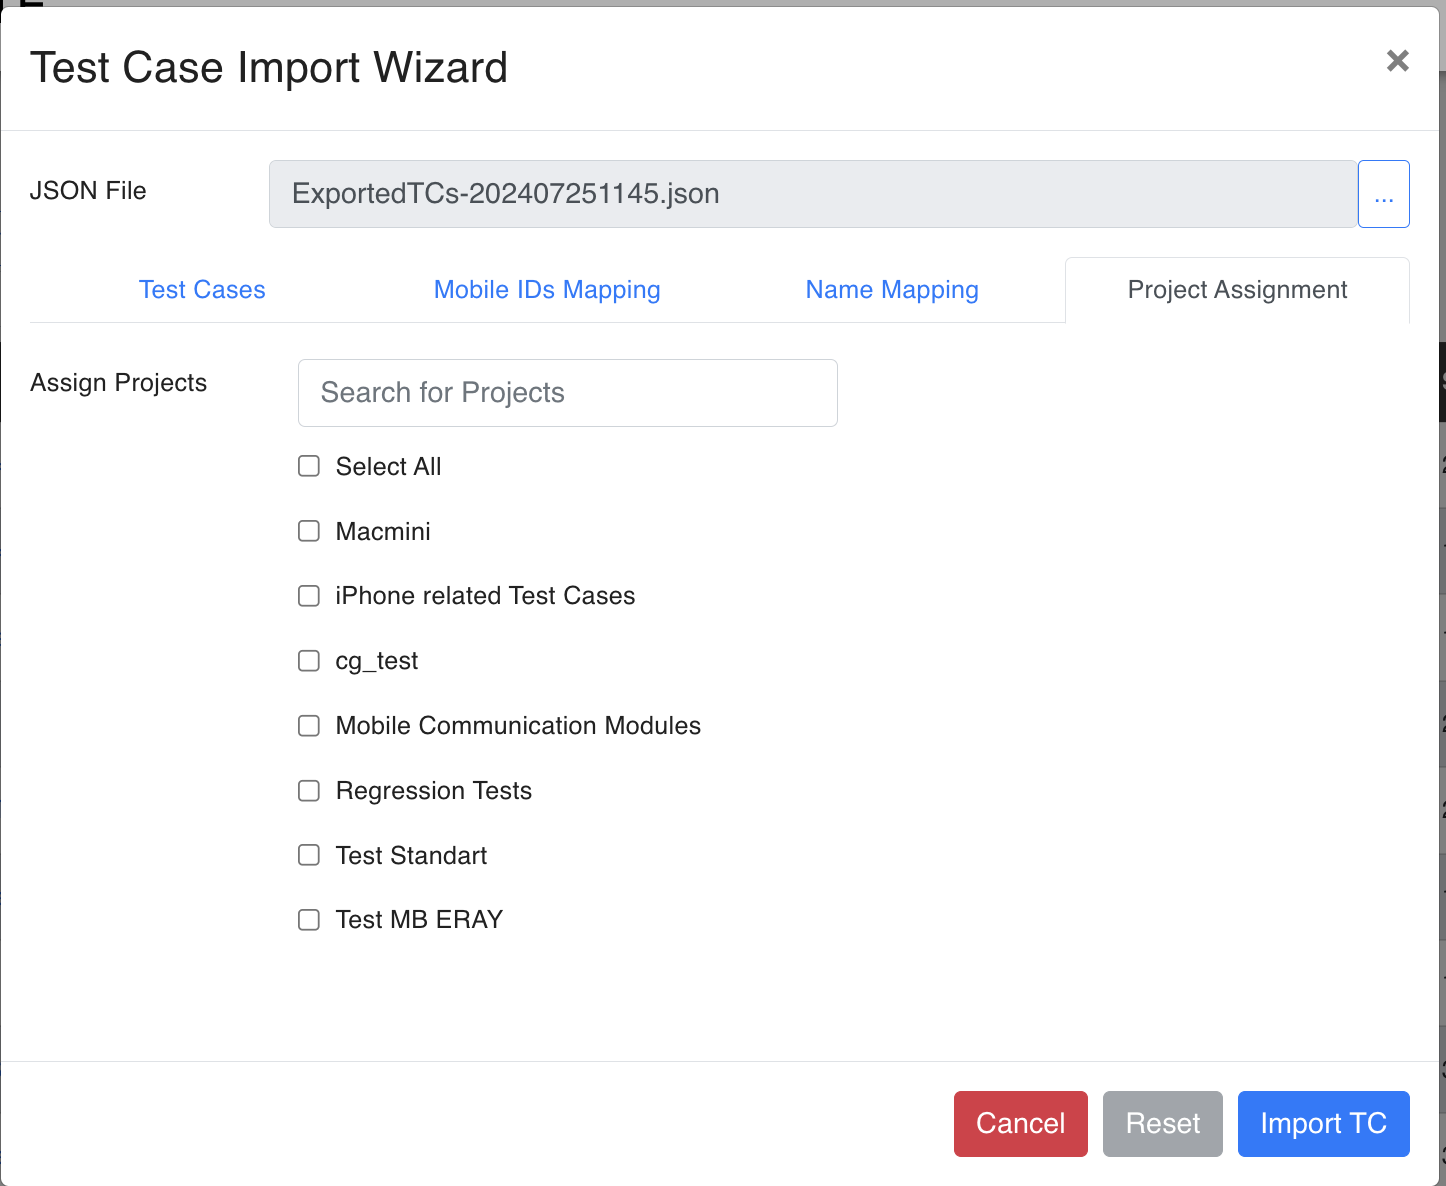
- Assign Projects: Search and select the projects to which the test case should be assigned.
Finalizing the Import
After completing all the steps in the Import Wizard, click on the "Import TC" button to finalize the import process. The test case will be added to your system with all the mapped details and assignments. When a step could not be mapped automatically, the wizard says "Manual Edit Needed After Import": open the test case afterwards and complete it.
By following these steps, you can easily import test cases from a JSON file and ensure they are correctly mapped and assigned within your system.
Delete a Test Case
The Delete Test Case feature allows you to remove test cases from your system. This is useful for managing and cleaning up your test case repository.
How to Use the Delete Feature
To delete test cases, follow these steps:
- Select the Test Cases to Delete: Choose one or more test cases from your list.
- Open the Action Dropdown: Click on the ⋮ menu.
- Select "Delete": Choose the "Delete" option and confirm in the Deleting Test Case dialog.

Handling Test Case in Test Suites
If the test case you are trying to delete is part of a test suite, it cannot be deleted. An error message names the suites that use it ("… It is used under Test suites: …"). Remove it from those suites first.
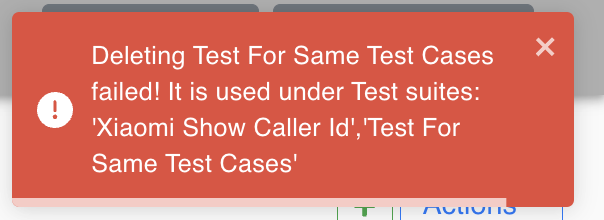
This ensures that you do not accidentally delete test cases that are actively being used in test suites, maintaining the integrity of your test plans.